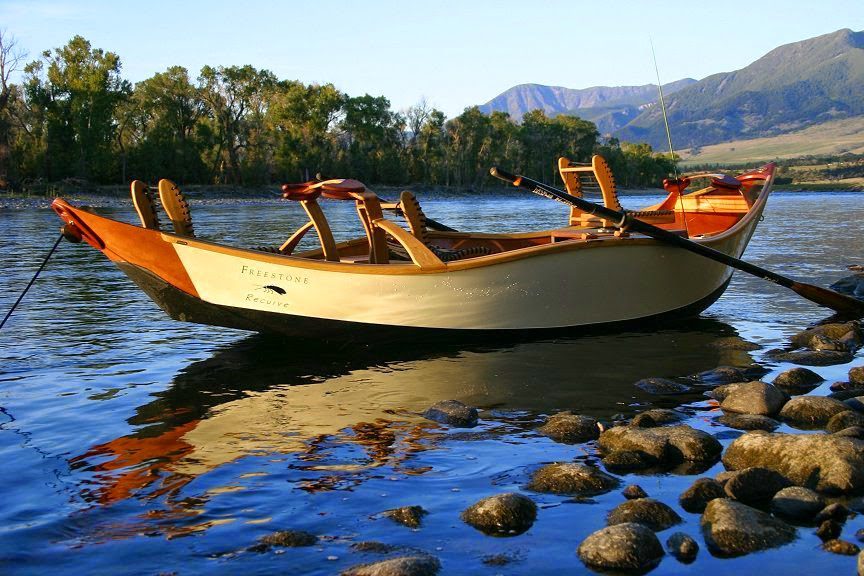
Two years ago I walked into Dan Bailey’s Fly Shop in Livingston, Montana and saw a two person driftboat built by Jason Cajune. It was both a work of art and a well thought out working boat. The exterior looked like a gel coat boat but the interior was detailed in mahogany. Wow, is what I said to myself. How cool.
As many of you know, I’m retired from a custom home building business “Clay Hash Handcrafted Homes”. I’ve been a woodworker since I was 18 years old. I’ve got a shop filled with tools that have been gathering dust for the last 3 years more or less. I’ve got a Delta Unisaw that I bought when I was 17. It was vintage then.
About 6 week ago I got a call from Joseph Podesta, who has built a wooden drift boat and wanted some help learning how to row. We spent a day on the river going over rowing techniques and rowing strategy and talked a lot about drift boat construction. Shortly after that, out of the blue the thought crystallized. “Build a Drift Boat, Build a Drift Boat”. I started surfing the net and low and behold I came across Cajune Boatbuilding – www.cajuneboats.com. The same guy that built the boat I saw at Dan Bailey’s.
He offers plans for a few drift boats designs or complete kits. Let’s see, woodworking skills, Check! Shop full of tools gathering dust, Check! Desire to build something, Check! Drift Boat rowing skills, Check! Love of floating rivers, Check. A dream was born. A project formulated.
I sent off $175 for the plans with a leap of faith, I received the plans and a complete manual for building a stitch and glue drift boat. I’ve spent many hours on Wooden Boat People, a forum of boat builders and read the manual from cover to cover. I’ve decided to build it from scratch without a kit. I’ve ordered marine plywood, Okoume, Epoxy and Fiberglass and made material lists for the solid wood stock, white oak, northern white ash and a little African mahogany.
I need to continue to organize my shop make more room, build construction tables, sharpen my chisels and hand planes, sharpen saw blades and get ready for the build. I’m on my way.
Photos – Getting Ready
 Building a fiber-glassing table. Jason recommends building a temporary glassing table about 2 feet tall. I cut down some old shop sawhorses to 2 feet tall and added a new 2 x 4 x 5′ top rail. I made 3 of these.
The rails placed on top of the sawhorses are made with two 2×4’s assembled in a “T” shape. These span between the sawhorses.
Essentially making a support system for a table 5′ x 16′ x 2′ tall. All I have to do in screw down the sheets to hold them in place. I could take the whole thing down in about 20 minutes.
I also build 6 plywood boxes out of scrap material that I can place under each leg of the saw horses. the boxes are 8″ x 8″ x 20″. I can place one box under each end of the sawhorse legs (6) and raise the table to the same height as my other work tables in the shop. So in essence I can make either a table 5′ x16′ x 34″ tall or a single table 5′ x 8″ x 34″ tall using the same setup.
I may be over thinking, but I’ll have that option.
 This photo shows the finished assembly table. I used 2 – sheets of 3/4″ x 4′ x 8′ plywood, screwed on top. 2 additional pieces of 3/4″ plywood, 12″ x 4′ x 8′, also get attached to make a table 5′ wide x 16′ log about 24″ off the floor. This table will be used to scarf two 3/8″ x 4′ x 8′ pieces of Okoume plywood together to make one sheet 4′ x 16′ long +/-. The sides will get cut to shape and then they will be glassed on the outside face.
This table will also be used to construct the bottom which will be made of a composite honeycomb core called “Plascore”. The sides and bottom will be “Stitched” together on the table. More on that as it happens.
 The Okoume Plywood arrived today. Zack helped me unload it. It’s awesome stuff.
Guaranteed no voids in the core and marine glue. Certified material with a stamp on it.
 Shortly afterwards the epoxy, fiberglass and Kevlar arrived.
So tomorrow I’ll head down to Sacramento on a quest for Rift Sawn White Oak and Northern White Ask.
Almost ready to make sawdust.

