Switch and Spey Casting Primer: Part III – The Forward Cast

The Forward Cast

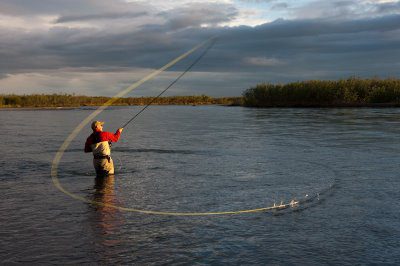
Before looking at individual types of spey casts, which are change of direction casts, let’s look at the most fundamental part, the stroke common with all spey casts, which is the “Forward Cast”.

The forward cast is such an important portion of all Spey Casts that the fundamentals of the forward cast really should be looked at separately. All spey casts are done by different manipulations of the fly line, a drag, a pull, a flip of the fly line, before the final delivery and finish with the “Forward Cast”.

This section will focus only on improving and perfecting the “Forward Cast”.

The simplest way to practice the forward cast is with the “Roll Cast”.

The reason why it is the best is that the roll cast starts from a static rod position. You can set your “D Loop” with the line over your shoulder and you can then concentrate on your rod and hand positions prior to throwing the “Forward Cast”

The “Roll Cast” for Practicing the Forward Cast
The “Roll Cast” is the perfect cast to perfect your “Forward Cast”.

By using the pause of the “Roll Cast”, once you have set your “D Loop”, you can to your rod and hands properly.

Use the pause to think about the starting position and how the cast should work.

When you are ready make the forward stroke.

To get a get a smooth tight loop your forward stroke must stop with a very abrupt positive stop.

The Fundamentals of the Forward Cast
Once you have set up your “D Loop” over your shoulder you need to get your starting position right.

(a) Concentrate on getting the arms in the right position to start.

(b) The top hand should be relaxed and at about ear height.

(c) The positioning of the top hand is dependent on the amount of line you are working. With a short belly line your stroke will be short (12” +/-) and in front of you. With a long belly line the stroke will be long reaching behind you and then accelerating forward.

(d) The bottom hand should be holding the rod at angle of approximately 45 degrees.

How the Power of the Forward Stoke is Developed
The power of the stroke comes from two aspects with short or mid-belly line lengths;

(1) The right wrist of the top hand snapping and coinciding with;

(2) The bottom hand powering or tugging back.

Both move at the very same time to maximize the power application.The power of the stroke comes from three aspects when casting long belly line lengths.

(1) The right wrist of the top hand snapping and coinciding with;

(2) The bottom hand powering or tugging back. Both move at the very same time to maximize the power application.

(3) The last aspect is that the right elbow locks straight.

The Forward cast Mantra “Body, Arm, Power”
Body, Arm, Power. This is the “Forward Stroke Mantra”. The three things that you want to concentrate on when practicing the Forward Stroke with the Roll cast is, Body, Arm and Power.

Body – The first thing that should happen with the forward cast is the body should be moving forward into the cast. Lean into the cast. Transfer your weight from the back foot to the front foot.

Arm – The arm angle is very critical to an efficient cast. The rod should be angled down from the ear at a 45 degree angle +/-. The rod should move forward with both hands at this same angle until the wrist snaps and the low hand pulls back simultaneously.

Note: A common error is to roll the cast forward, this throws the rod forward in an arch forming a big open loop without any power. Avoid an early tilt and rotation of the rod.

Power – Work on the simultaneous, wrist snap and pull back for the power stroke. The delayed tilt and continuous application will give you a tight powerful loop.

Common Faults with the Forward Stroke
“Hitting From the Top” – This is an impatient forward stroke. The forward stroke starts with a massive force. An over application of power, too soon. This stroke tend to climb in the air and falls with no power.Creep

This is caused by eagerness or anticipation of the forward stroke. The back cast is completed, the rod stays still for the required amount of time, and the forward stroke starts.

“Creep” – This happens when while you wait for the back cast to anchor or get into position, you creep forward with the rod to almost in the vertical position. You then apply the power from the 12 o’clock position, once you have moved the stroke too far forward. When this happens you have lost your half your power stroke and run out of gas so to speak.

By the time the power is applied the rod is past the vertical position and forces the line to force downward and crumples into the water instead of flying out above the water.

To correct “Creep”, remember that when you’ve completed your back cast, your rod should be motionless or still, shift your body weight forward, maintaining the correct rod angle and then make the forward cast.

If your line is firing downwards into the water, work on not creeping.

“Thrusting” – Thrusting is common when transitioning from single handed casting and not pulling back with the bottom hand.

The bottom hand goes forward with the top hand and doesn’t pull back.

To correct “Thrusting” pull back on your top hand as you turn your wrist into the forward cast simultaneously.

“Rolling the Shoulder” – Avoid rolling your shoulder, or rotating the shoulder around as you make your forward cast.

If you roll or rotate your shoulder it doesn’t allow your cast to fire in a straight line. It will follow your rotation and not fire in a 180 degree line.

The cast will unfurl in a curving, sideways, fading direction.

The cast will land in a downstream loop with your flies upstream.

To correct “Rolling the Shoulder” square your shoulders to your target line when making the forward cast.

Switch and Spey Casting Primer: Part II – Anchor Groups

Anchor Groups

In this article, Switch and Spey Casting Primer – Part II, I want to discuss Anchor Groups.

The anchor for your spey cast is the portion of line that is lying on the water once you form your “D Loop”. All spey casts will fall into one of two anchor groups, either the waterborne anchor group or the airborne anchor group.

Airborne Anchors
The first group are “Airborne Anchors”

  • An airborne anchor cast is where the line is in the air, lands, splashes and goes. This is often referred to as a “Touch and Go”.
  • A good cast to perfect and practice setting up an “Airborne Anchor” is the “Switch Cast”
  • The “Snake Roll” is an example of an “Airborne Anchor” cast.
  • The success of any airborne anchor cast is dependent upon timing the touch down properly.
  • You want to time your cast so that the forward cast starts just as the end of the fly line and nail knot touches down.
  • The advantages of airborne anchor casts are that they are a quicker change of direction. It takes about 4/7th’s of the time compared to a waterborne anchor cast.
  • Another advantage is that it doesn’t make much disturbance on the water. The waterborne anchor casts make a lot of noise when you rip the line off the water.
  • The airborne anchor casts are silent if done correctly.
  • Using an airborne anchor cast with sinking lines doesn’t allow them to sink during your cast.

I’ll discuss the fundamentals of a spey cast using an airborne anchor when we review the “Switch Cast” in a future article.

Waterborne Anchors
A waterborne anchor cast is a cast where the anchor is set up on the water, it settles, it stays in the water as you come around to form the “D Loop” and only when you start your forward stroke does it lift off the water.

  • A good cast to perfect and practice a “Waterborne Anchor” cast is the “Roll Cast”
  • A “Double Spey” is an example of a waterborne anchor spey cast.
  • These tend to be the easier casts to learn because you can break down the waterborne casts into segments.
  • Waterborne anchors also casts work well with large flies.
  • We will review the fundamentals of a “Waterborne Anchor Cast” when we review the “Double Spey” cast in a future article.

Spey and Switch Rod Casting Primer – Getting Started

When you first start to get ready to start spey casting you need to have some “Practice Casts” at your disposal. These are straight line casts.

To get you prepared  I’m putting together a series of articles to create a “Spey and Switch Rod Casting Primer”. The Primer will cover the basic principals of spey casting and the execution of practice casts like the;

  • “Roll Cast” and the
  • “Switch Cast”.

It will also cover the basic spey casts like the;

  • “Single Spey”
  • “Double Spey”
  • “Perry Poke”
  • “Snap T”.
  • “Snake Roll”
  • “Circle Cast”

I’ll publish this primer on the Fly Fishing Traditions Blog as well as eventually on the Fly Fishing Traditions website.

This Part I will cover the Basics to get started with spey casting.

Starting Off

When you arrive at the river to practice there are some things you should do to prepare for your day.

  • It’s a good idea to tape the joints of your switch or spey rod with electrical tape. Spey casting creates a lot of torque and twisting and if section of the rod comes almost undone it can break your rod.Set your rod section moderately tight and then tape them.
  • You can use the same tape about 8 or 10 times. Simply unwrap from one piece and re-wrap in on the other until the next time you use it.
  • Most of you fly fishers out there already know that hen threading your fly line through the guides, thread the end of the fly line or the fly line doubled up on itself instead of threading the leader. It’s a lot easier than threading your tippet through the guides.
  • When rigged up and walking through brush and weeds wrap the line a few times around the rod, face the rod behind you and walk through instead of having the rod facing forward. The rod will follow your path through.
  • Remember for safety always wear a hat and glasses. Protect your head and your eyes.

Fundamentals – The Grip

Find the balance point of your rod with your top hand. Where the rod balances level is the approximate location of your top hand. Find the balance point and close your hand on the rod. This will be your top hand position. Grab the bottom of the rod with your other hand.

  • The grip is important for casting efficiency and for comfort.
  • Hold the rod loosely, not tightly.
  • The top hand is your fulcrum point which makes the spey rod an effective lever.
  • You can adjust the balance point by adding weight to your reel or using a larger or smaller one.

Fundamentals – The Stance

  • Stand comfortably and safely in an athletic posture
  • You want a stance that will help your cast.
  • Think about casting as an athletic endeavor, like throwing a baseball, football or hitting a golf shot, there is balance and shift of balance.
  • Casting is another athletic movement where you move from your ankles and your hips and lean into the forward cast.
  • You want a stance that will allow body rotation and changing of weight and balance.
  • For a right hand cast you want an open stance with the left foot forward. This will allow you to rotate through your hips to set up your backcast and the rotate forward for the delivery cast.
  • An open stance allows you to lean into your cast.
  • If you want to try standing with your right foot forward and your right hand high on the rod and your left hand low, you will find that the stance will block your ability to rotate and set up your back cast properly.
  • If you were to cast from the back side, with you left hand high on the rod, and your right hand low, you would open up your stance with your right foot forward. The total opposite.

Basic Principles of Spey Casting

There are three basic principles that apply to all of the spey casts that you will employ. These first two principals are “Set Up” principals

The “D Loop”
The first principal, which is a “Set Up” principal and probably the most important principal, is the loading of the rod. The “D Loop”. This is the curve behind the rod. This is the weight that loads the rod and makes the rod cast easily. The bigger the “D Loop” the more the rod loads and the easier the cast will go out.

“Line Stick”
The second principal, which is also a “Set Up” principal is equally important,. It is called “Line Stick”. “Line Stick” refers to the amount of line that is lying on the water as you start the forward cast. This is the critical point, the line is like tacky glue, the more line that is in contact with the water at the start of the cast, the more energy is lost when trying to rip the line off the surface film. If you have too much “Line Stick” your cast sort of dies and fails.

A good spey cast will have a little line on the water, just the tip of the fly line, with a small amount of “Line Stick” on the water. When you start your forward cast, it will come cleanly out of the water with little problem.

“180 Degree Principal”
The third principal the “180 Degree Principal” which makes a spey cast fire to your target properly. This principal is very simple, the forward cast is opposite of the back cast.

When you pick a target on the opposite bank for your forward cast, your back cast must be set up 180 degrees behind you, or opposite of the target.

To visualize this effect, string up the top section of your rod with yarn and pull back on it like a bow and arrow. When you let go, the yarn flies straight forward, 180 degrees, from the starting point, or opposite of the starting point.

To make your cast fire properly to your target you must get this right. Practice makes perfect.

Putting These Basic Principles to Use on the Water

The first principal we identified is the “D Loop”, which is the action that loads the rod for the forward cast.

Putting the “D Loop” to Use

  • The smaller the “D Loop” the less the rod will flex against it and the more you’ll have to “whack it” or “muscle it”.
  • If you have more room you want to set up or “throw” a bigger “D Loop”. This will give you more weight of line on the water to load the rod. This will load the rod more naturally, cleanly, efficiently and allow you to launch a forward cast with much less energy
  • The “D Loop” is controlled by the amount of energy that you use to throw the cast behind you.
  • A good analogy from Simon Gawesworth is throwing a Frisbee. If you were going to throw a Frisbee a short distance behind you, say 5 feet, you would use a short soft floater for your throw. If you use a short soft throw back with your rod setting up a “D Loop” you will have a small “D Loop”.
  • If you were going to throw the Frisbee 20 feet behind you, you would use more of an effort to get it there. You must use more energy throwing your line behind you to form a larger “D Loop”
  • The slower you come back to form a “D Loop” the smaller the “D Loop”.
  • The faster you come back, the larger the “D Loop” will be. You need extra speed to create a larger more efficient “D Loop”.
  • Ideally you would like a larger, more efficient “D Loop” but sometimes you are restricted on your back cast by tree, bushes or other obstacles. This is where you want to make a small “D Loop” Use a slower motion to set it up, a small toss backwards.

Practice both types of “D Loops”. Practice casting making small and large “D Loops”. You’ll need this in your bag of tricks when you are out on the stream.

Putting the Principal of “Line Stick” to Use
The second principal, “Line Stick”, “Grip” or the “Anchor Point” all refer to amount of fly line on the water prior to starting your forward cast, after you have formed your “D Loop”

Ideally you want to strive for minimal line stick. Let’s talk about why.

  • A bad combination is a small “D Loop” and a lot of line stick. When you start your forward stroke you have to rip all the line “Sticking” on the water to make the forward cast.
  • Half the energy of the cast is used just to rip the line off the water.
  • The ideal cast is to form a large “D Loop” and only have the leader and maybe your nail knot in contact with the water.
  • Strive for “Minimal Line Stick” – This generates the most power with minimal effort.

Putting the “180 Degree” Principal to Use
The third principal, the 180 Degree Principal, is the most difficult. Spey casting is about changing direction, then casting up and down the river. You need to add “Rotation” to your casting stroke.

  • The 180 degree Principal is accomplished with “Body Rotation”.
  • Most spey casts are started with the line below you and roughly parallel to the bank and you want to recast across the river or stream on a roughly perpendicular line.
  • You cannot load the rod properly with an upstream “D Loop” when you are targeting across stream. This cast will fail. You have violated the 180 degree principal.
  • When establishing the position of the “D Loop” you must rotate your hips and bring the “D Loop to the position “180 Degrees” or “Opposite” of your target.
  • When practicing turn your head and see where your anchor point is set. Work on getting it “Opposite or “180 degrees” from your target.

Summary

When casting, and especially when practicing, remember these three principles, which are the basis of all spey casting.

(1) Form your “D Loop” correctly.

(2) Strive for minimal “Line Stick”

(3) Remember the “180 Degree Principal” and rotate your hips and body to set your “D Loop “Opposite” or “180 Degrees” from your target.

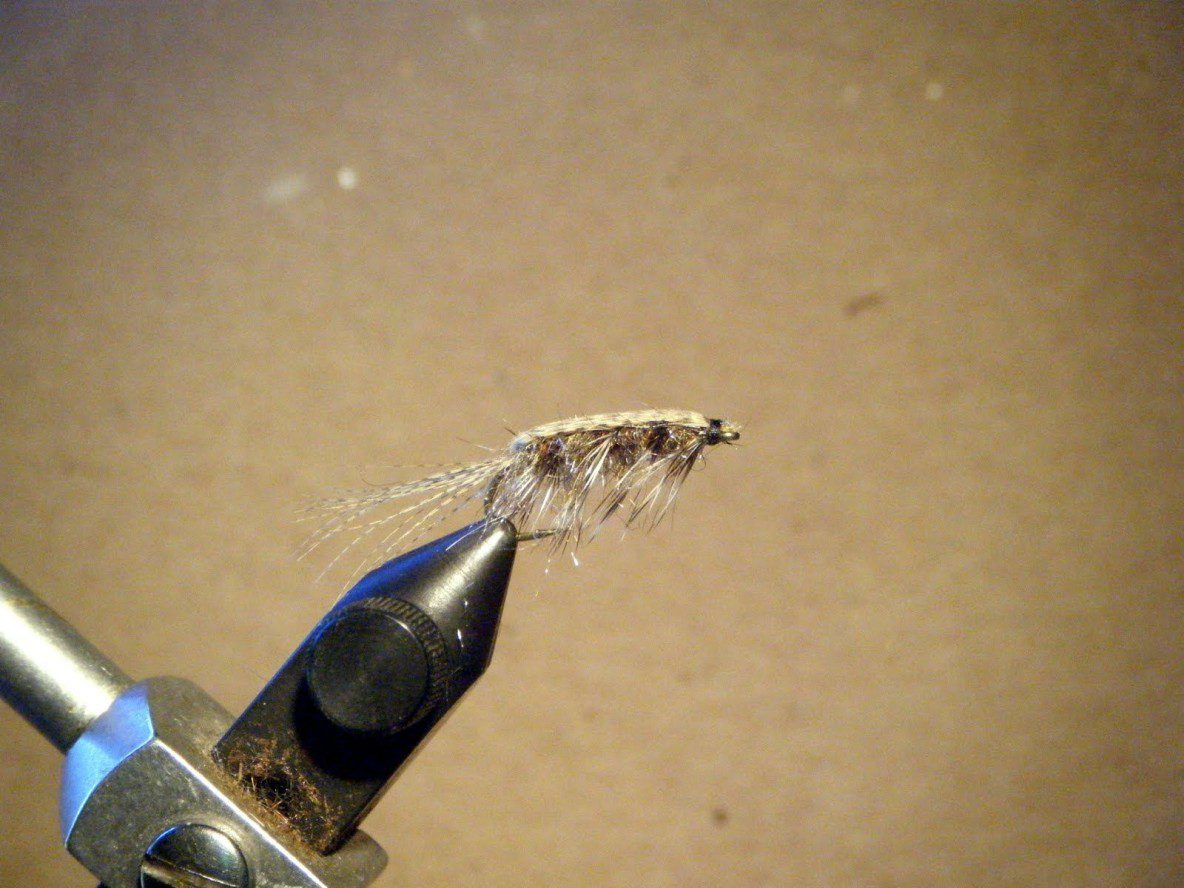
Denny Rickards’ Callibeatis Nymph

I fished a lake near Island Park, Idaho this past weekend as a part of Phil Rowley’s Stillwater School, I’ll get into that in another post, and found callibeatis mayflies, swimming in the shallows as well as many shucks. There were callibeatis emergers struggling to escape their shucks. I went right into my box and picked a Rickard’s Callibeatis nymph and went to work. The fish were on to the fly as soon as I found out where the were hanging out. Others were using a Pheasant Tail Nymph, but I’d say my nymph out fished the PT.

This pattern is a great “Go To” pattern to be used as a searching fly or to match the hatch. You need to have this fly in your stillwater box.

Rickard’s Callibaetis Nymph Recipe

Hook – 2x – Tie sizes 12 through 14, Size 10 early in the season.
Tail – Wood Duck or Dyed Mallard
Rib – Copper Wire
Body – Hares Ear
Hackle – Grizzly. Use straight grizzly for the tan version. Use olive dyed grizzly for the olive version.

Rickards Callibaetis Nymph Notes

  • It is recommended to tie this pattern in colors of tan, olive, black and rust/cinnamon.
  • This pattern is tied un-weighted as it is designed to be fishing up near the surface.
  • This fly is named the “Callibeatis Nymph” but it is a “Go To” fly when ever fish are working near the surface, feeding on midges or other bugs. It is an impressionistic fly. You can retrieve it or let it sit.
  • When selecting wood duck fibers for the tail don’t tie them in so they curve to one side or the other. Make sure they are facing straight back.
  • This fly should be presented with a floating or intermediate line. Use short slow pulls. You want to keep this fly in the top foot of water, so adjust your retrieve accordingly.
  • When fishing any fly near the surface you need to remember to use a longer leader, 12 to 15 feet long, tapered down to 4x or 5x. You need the longer leader especially when using a floating line because the floating line makes surface disturbance when you cast, strip and then retrieve the fly. The determining factor is the clarity of the water.
  • This fly is typically fished in the in the top 2 feet and is seldom fished it deep.

Tying Instructions


  • Denny Rickards' Callibeatis Nymph1. Place hook in vice and start thread wrap behind the eye of the hook. Cover the hook back to the hook bend.
  • Denny Rickards' Callibeatis Nymph2. Pinch off a a small bunch of wood duck fibers. You want this to be a sparse bunch. Make sure that when you tie in the tail that the fibers point straight back and don’t bend to one side or the other. This provides more movement of the tail. Tie the tail in standard length about 1/2″ to 3/4″ long. Tie in the tail, bind it down.
  • Denny Rickards' Callibeatis Nymph3. When done, pull the fibers back towards the tail and bind down the remainder. This will be used for a back.
  • Denny Rickards' Callibeatis Nymph4. Tie in the copper rib at the tie in point at the tail. Use standard gauge wire, not too small.
  • Denny Rickards' Callibeatis Nymph5. Tie in the grizzly saddle hackle. For the olive version tie in an olive grizzly hackle.Tie the hackle in by its tip. You don’t want this hackle to be palmered.
  • Denny Rickards' Callibeatis Nymph6. Tie in a dubbing loop that is about 5 inches long. For the olive Callibaetis Nymph use olive Hares Ear dubbing. Place the fur cross-wise into the dubbing loop. Hold the material with your hand to keep the material from spinning and then spin the dubbing loop tool while holding the material. Let go of the material and it will spin itself. Pick out the excess to create a consistent rope. You can add more material below to extend the length of the dubbing rope.
  • Denny Rickards' Callibeatis Nymph7. Once you have the correct amount of material in the rope continue spinning the dubbing loop tool until you have a tight dubbing rope.
  • Denny Rickards' Callibeatis Nymph8. Spin the loop tool a bit more and start placing wraps one in front of the other towards the eye of the hook. Wrap the rope forward and tie the rope off. Clip off the remaining rope.
  • Denny Rickards' Callibeatis Nymph9. Wrap the copper rib forward, spaced closely to create segmentation about 10 times or more on a 2x hook. Tie off the wire at the head of the fly.
  • Denny Rickards' Callibeatis Nymph10. Wrap the hackle forward with 3 turns only. Tie off the hackle at the head.
  • Denny Rickards' Callibeatis Nymph11. Pull the excess tail material over the top and over the eye of the hook to form a back. Turn you vise to check that the fibers are staying directly over the top of the fly and not over to one side or the other.
  • Denny Rickards' Callibeatis Nymph12. Whip finish the head. Trim the hackle fibers at an angle along the sides so the hackle fibers are facing mostly downwards. Apply head cement and you’re done.

How to fish Rickards’ Callibeatis Nymph

  1. Use this fly when you see fish working on the surface. Remember that you need to fish this fly very slowly or with little or no movement at all.
  2. Start with an intermediate line and use a slow hand twist retrieve, very slow.
  3. You can also use a short slow pull with an emphasis on slow.
  4. You can use this fly when sight fishing and if you see a rise ring, cast to the right or left of the ring and the start the short slow pull.
  5. When using a floating line, grease your leader within 4 to 6 inches of the fly, using a longer leader of 12 to 15 feet and let it sit. Or you can let it sink a bit and retrieve it with a short slow pull or slow hand twist speed. Emphasis on slow.
  6. You want this fly to look like a bug getting ready or is just emerging. The fish will not be looking for much movement.

The Yuba Skwalanator – The Experiment

Note: The colors are definitely more golden than this photo captures

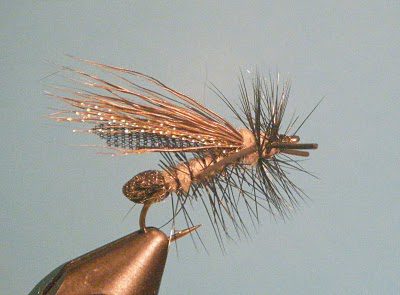
Introducing “The Yuba Skwalanator”. I’ve been on a quest since last winter after being humiliated by refusal after refusal of every Skawala dry fly I had in my box, to come up with a better pattern to match the Skwalas on our local Lower Yuba River. I had decent luck last February and March with the standard patterns I carry when fishing the nervous types of water, but when the fish would move down into eddy type water or the flats below riffles where they could really take a good look at the flies, no takers. They turned up their noses and said “Fakers go home!” They would take live Skwalas inches from my dry fly put no dice.

So in an effort to refine this pattern I have collected just about every pattern on the market out there and talked to my fishing buddies, taken many mental notes and this is the pattern I’ve come up with this tie.

Recipe for the “Yuba Skwalanator”

(Arnold is still Governor by the way).

Hook – Tiemco 2312, Size 12 (This is the first major change. The Lower Yuba Skwalas are smaller than most patterns in the market)
Thread – 6/0 or 8/0 Black ( I like to use the 8/0 because of the many materials used in this pattern.
Egg Sack – 1/8″ black foam cut to 3/32″ wide. (Double over and tie about 1/8″ past the hook bend.
Body – Blended antron dubbing 2/3 golden, 1/3 olive. ( This is the second major change from all the patterns on the market. The Skwala on the Yuba river are more Golden Olive with emphasis on the golden)
Under wing – Hareline No-Fray Wing Material Black (Fine mesh wing material like micro window screen)
Over wing Flash – 5 to six strands of Krystal Flash
Wing – Dark Brown Deer Hair – (Sparse Wing)
Dubbing at Thorax – Blended antron dubbing 2/3 golden, 1/3 olive
Rubber Legs – 2 pairs of Hareline Fine Round Rubber Legs Black
Hackle – Black Dry Fly Hackle size 14

That’s a lot of materials to fit on that size 12 hook. Minimize your wraps and dubb with very small amounts of dubbing. Sparse!

Can’t wait to give it a go. If I was a trout, I’d eat it. If they work I’ll sell them on the river for $20 a pop. Kidding!

As a note: I’ve tied some of these with the Deer Hair wing using the cut butts over the wing. I’ve heard that that has made a difference. I took photos of this with a standard wing because it was prettier. I guess the trout might like the weird hair do.

Thanks to Norm Sauer, Tom Page, Keith Scott and Frank Rinella for their insights on the Lower Yuba River Skwala hatch. Also thankd to ralph Wood who came up with a Skwala Pattern that inspired this sort of “Stimulator Tie”. Thus watch out for the Yuba Skwalanator.

Skwala “Knothead” Prototype

I’ve been able to play around at my vise with the rain pounding down for the last week or so. The Lower Yuba flows are receding a bit, but today they are still running at over 12,000 cfs, which is down from 20,0000 two days ago. When all this is over hopefully the Skwalas will have survived and be starting up.

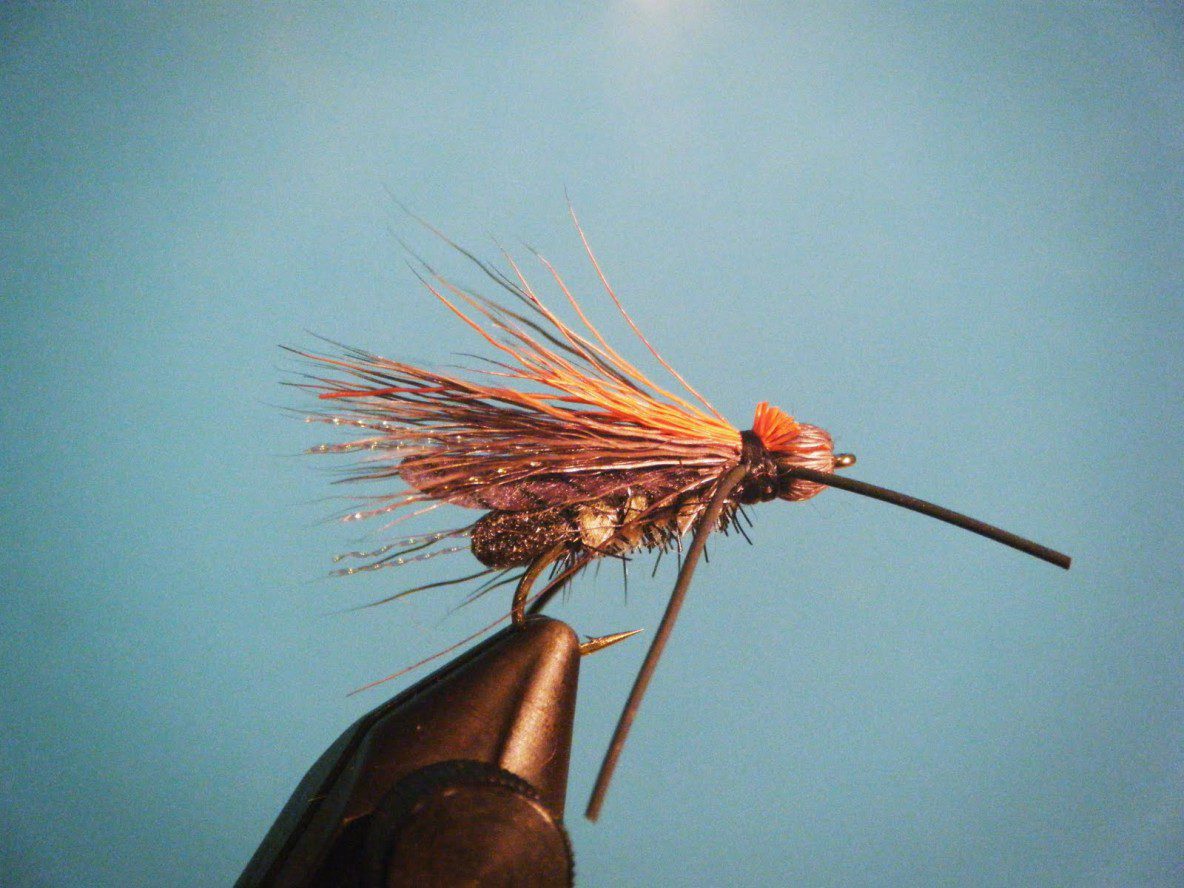
I’m trying to refine two types of Skwala dries, one for the bouncier, nervous water, which so far is the prototype “Skwalanator” and now I’ve come up with a slow, eddy water prototype pattern I’m calling the “Knothead”.

The resident rainbows will take a Skwala Dry with reckless abandon sometimes in the nervous moving water when the Skwalas are in the drift, many patterns work, some better than other. When the fish are staged in slack or eddie water feeding on the helpless Skwalas it’s a different story, a much more imitative pattern is required. Twitching the fly can help but I’m convinced that you need to get (1) the profile correct (2) the size correct and (3) the color much closer to the natural. Thus the need for two separate patterns.

This is all conjecture and experimentation and will hopefully be put to test in January.

Pattern Recipe for the “Yuba Knothead”

Skwala_Knothead_-_Bottom_ViewThis “Skwala Knothead” prototye pattern is tied with a bullet head using gray dun died compradun deer hair. It has a dubbed body and a sparse overwing. I’ve trimmed the palmered hackle that runs through the abdomen on the bottom to enable the fly to float flush or just below the film. I’m still looking for the right rubberleg material and this mini black rubberleg material may be to large. Like I said it is a prototype until the fish tell me they like it.

Hook – Tiemco 2312, Size 12
Thread – 6/0 Olive (I like to use the 6/0 for the deer hair bullethead)
Egg Sack – 1/8″ black foam cut to 3/32″ wide. (Double over and tie about 1/8″ past the hook bend).
Palmered Hackle – Size 14 black dry fly hackle
Body – Yellow antron dubbing wrapped with the Olive thread (When the yellow dubbing is wrapped with the olive thread the olive color blends with the yellow dubbing to give it the yellow/olive cast that you need to match the Yuba River Skwalas. This is the second major change from all the patterns on the market.
Under wing – Hareline No-Fray Wing Material Black (Fine mesh wing material like micro window screen)
Over wing Flash – 5 to six strands of Krystal Flash
Bullethead/Overwing – Dark Brown Deer Hair – (Sparse Wing)
Rubber Legs – 2 pairs of Hareline Fine Round Rubber Legs Black
Visible Over Wing – Small bunch of orange dyed Deer Hair

Once the fly is completed, carefully trim the deer hair overwing and remove all the deerhair at the bottom and on the two sides until you get the desired profile of a sparse overwing. I’ve left some on the sides as I just think it makes the fly look buggier. If the trout don’t like it I’ll just trim more off the sides.

Also trim the palmered hackle off the bottom of the fly.

I can’t wait to test this pattern out!

Baetis Complex: Part III – Presentation for BWO Nymphs and Proven BWO Nymph Patterns

I personally have the most experience fishing with baetis nymphs on the Lower Sacramento River below Redding here in Northern California. Some of the best baetis nymph patterns that I have come across have been developed and thoroughly tested there. Patterns developed by Mike Mercer, Hogan Brown, Ken Morrish, Brian Silvey, to name a few, have developed “go to” patterns where ever baetis complex bugs are found. There are times on the Lower Sacramento where the small bugs dominate the preference of the trout and it’s becomes “go small or go home”.

As a note, fishing the baetis complex on the Lower Sacramento is almost entirely a deep, dead drifting affair with long fine leaders.

Baetis Complex Nymph Presentation

On most streams and rivers and when targeting the Baetis complex, the pre-hatch restlessness of the swimming nymphs make then available for some time before the duns appear on the surface. Baetis nymph patterns are most effective as (1) searching dressings fished deep along the bottom or (2) fished high in the water column over feeding trout just before the hatch. There are some instances where trout will continue porpoising and tailing to nymphs throughout an entire hatch and ignore the duns completely.

Searching Dressings Fished Deep

During the hours when no BWO hatch is happening, small nymphs can be fished with a free drift on or very near the bottom using the split shot and indicator method. I usually rigg with a 9ft 3x leader to the split shot and then tie two to three nymphs tied hook bend to hook bend. I match the terminal tippet to the small size of the baetis imitations and go down to 5x fluorocarbon. I’ve come to recommend the thing-a-ma-bobber as the indicator of preference.

Unweighted Nymphs Fished Shallow

In the hour or so before the hatch, the same flies can be fished with some success using the traditional wet fly swing, just inches deep. Mend the line to slow them to the speed the restless naturals might move in their attempts to move to the surface and then back down to try again.

When the duns appears, it’s a not a bad idea, to continue fishing a nymph, but high in the water column. Rigg with a long leader and present the fly with upstream casts, just as you would a dry fly to a rising fish. Let the small imitations sink a few inches below the surface film. It may be necessary to treat all but the last few inches of your fly line with floatant. This will keep the fly up in the water column and help you to detect strikes. You may want to add a tiny yarn indicator into the leader five or six feet up from the fly. Set the hook to any movement of the indicator or to any visible rise anywhere near it.

Dry Dropper

You can also fish the Baetis complex hatch with a dry dropper setup. You can tie an un-weighted nymph dropper about 2 to 3 feet behind the dry. The dropper can be tied to the hook bend of the fly chosen to imitate the dun. You might even want to try a cripple as the fly in the surface film. You are effectively giving the trout two options.

Your Outfit

It is stated that when fishing the Baetis complex hatch you should use your finest presentation outfit. Many anglers use a 3 or 4 weight set-up. Here on the Lower Yuba when I’m wading I’ll typically stick with a 5 weight. We typically come across the BWO’s in the runs which is more nervous water, or in back eddies. There are some flats that have more of a spring creek feel to them and I’m sure my presentations could benefit from going with a smaller rod and line. Whichever outfit you use, this hatch requires short and accurate casts with the most delicate presentations.

I’m most often fishing the Northern California rivers from my drift boat and am usually gunned with a Sage XP or Z-Axis 6 weight. We’re usually fishing deep under indicator and the 6 weight handles this rigg really well. It also helps when you hook up a large Lower Sacramento or Lower Yuba rainbow.

Baetis Complex Nymph Imitations

The Baetis Complex nymphs range in size from a size 14 down to size 24. The most common sizes are 16 to 20. Colors of the naturals vary from pale olive to dark olive-gray and dark olive-brown to brown. Their imitations should be tied on 1x short to 1x long hooks and are usually tied un-weighted.

It must be said that there is no better way than to to do stream sampling of your own home waters and match (1) size (2) shape (3) color of the naturals. There are just too many sizes and variations to cover all the baetis complex nymphs. As with most imitations, the size and the shape are of the most importance.

Many experienced fishermen and guides have found that trout routinely feed on these small nymphs even when there is no hatch activity. Many times a small Baetis nymph will out perform a larger imitation in non-selective situations, especially in waters where good numbers of the naturals are found. When the hatch does occur, fish will feed selectively on the tiny nymphs during the early stages of the hatch.

Proven Baetis Patterns with Recipes

For the fly tyers out there, here are some recommended patterns that also have tying recipes. There are many commercially tied patterns available out there at fly shops all over the west, but in many instances the recipes are proprietary and not readily available. This list provides patterns that you can tie and will cover the Baetis complex hatches wherever you find them. Tie them in the right sizes, and colors to match the baetis nymphs you find on your streams and rivers and you’ll be good to go.

I’ve provided a list of commercially available “Go To” flies in a previous blog article http://flywheel:guiltless-strategy@whole-magic.mysites.io/patterns-blue-wing-olives-baetis/

Pheasant Tail

(Originator: Frank Sawyer)
Pheasant_Tail_NymphEveryone should carry Pheasant Tail nymphs and Flashback Pheasant Tail nymphs in their boxes. It is one of the best all around nymph pattern you can find.

Hook – Standard nymph, 1x long, size 14-24
Weight – Scant turns of undersized lead wire, or omit
Thread – Brown 8/0
Tails – Pheasant tail fibers
Rib – Fine copper Wire, counter wound over abdomen
Abdomen – Pheasant center tail fibers, as herl
Wingcase – Pheasant tail fibers
Thorax – Pheasant tail fibers as herl
Legs – Tops of thorax fibers


Pheasant Tail Flashback

Pheasant Tail Flash BackThough the Pheasant Tail as per the pattern above is more imitative of the natural nymph, many tiers consider the Pheasant Tail Flashback the more effective pattern. To tie this pattern as a Flashback, use Pearl Flashabou in place of the pheasant-tail fibers for the wingcase.


Baetis Nymph

(Originator Unknown)
No photo available at this time. Refer to the book “Western Mayfly Hatches” listed at the end of this article. This impressed me as a good one to use as a standard pattern tied to match the baetis nymphs in your stream.

Hook – Standard nymph, 1x long, size 12-24
Weight – Scant turns of undersized lead wire, or omit
Thread – Olive 8/0
Tails – Olive-dyed mallard flank or partridge fibers
Abdomen – Light olive to dark olive-brown fur dubbing
Wingcase – Mottled turkey tail or dark goose primary feather section
Thorax – Slightly darker fur than abdomen
Legs – Olive-dyed mallard flank or partridge fibers or thorax fur picked out

Pattern Notes: This is a good standard nymph pattern for members of the Baetis complex for a more accurate match. This pattern is well suited to collecting of a natural and then matching the color. Remember that colors of the baetis Complex can change from stream to stream and even different portions of the same stream. It is most likely that trout will accept this pattern in the medium range of colors, most of the time. Size and form is most important.


Krystal Flash Baetis Nymph

(Originator Rick Hafele)
krystal flash baetis nymphHook – Tiemco 2457, 1x short, size 16-20
Weight – None
Thread – Olive 8/0
Tails – 3 to 6 light gray hackle fibers
Abdomen – 4 to 6 strands of peacock Krystal Flash, or a color to match your own naturals, tied in at the hook bend, twisted into a fine rope, and wrapped up the hook shank
Wingcase – Mottled turkey tail or strands of dark brown to black Krystal Flash
Thorax – Tan to dark brown fur dubbing with guard hairs picked out

Pattern Notes: This small nymph sinks well because of the Krystal Flash body, yet the loosely dubbed thorax retains some life like action. It can be fished deep or just under the surface. It presents a realistic impression of the natural when tied in the appropriate size and color. It is durable and easy to tie.


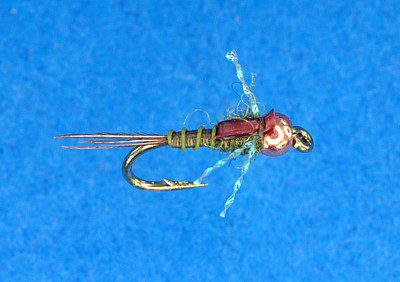
Hogans S&M Nymph

(Originator Hogan Brown)
Hogan_s_S_M_Nymph_-_OliveHook – TMC 3769 #16-18
Thread – Dark Brown 8/0
Weight – Copper Bead
Ribbing – Wapsi Olive Ultra Wire, SM
Abdomen – Olive Thread 8/0
Tail – Pheasant Tail Fibers
Wingcase – Dark Brown Goose Biot
Thorax – Dark Olive Antron
Legs – Olive Krystal Flash

Notes: I first started using the S&M Nymph when fishing the Lower Sacramento River and it has been a proven producer. When the Lower Sac goes into the small bug bite mode I usually have an S&M nymph or a Military May nymph rigged up. From what I have researched the S&M nymph is weighted by use of a Copper bead head but has additional sinking capabilities through the use of a thread body, streamline shape, and Ultra wire for the distinct segmentation. Hogan uses a Goose Biot for the wingcase which provides a distinct color contrast to the thorax which is typical with natural Baetis nymphs having a darker hue on the top of the thorax. Krystal Flash is used for the legs which provides attraction and movement to the fly yet does not detract from it’s sinkability. I’ve often used it as a dropper on the Lower Sac and Lower Yuba when I need to get the nymph down quickly.

Other Proven Hogan Brown Nymphs: I don’t have recipes for some of Hogans other nymph patterns such as Hogans Military May – BWO and Hogans Better Baetis. You can get them anywhere that sells Iydlwilde Flies.


Pale Baetis Nymph

(Originator Jeff Morgan) Pattern from Westfly
palebaetisnymphHook – Dai Riki 310, size 20-22
Thread – 8/0 rusty dun
Tail – Three short widgeon flank feathers
Abdomen – Tying thread, perhaps counter-ribbed with iron gray 8/0 thread
Thorax – One or two wraps of pale olive dubbing
Wingcase – Mottled oak Thinskin
Legs – Pale olive Antron fibers, sparse

How to Fish – In rivers, the fly can be presented near the surface, but it is usually most productive when fished near the bottom on a dead drift with the indicator or tight line presentations. To achieve the right depth, you may need to put weight on the leader or use the fly on a dropper with a heavier fly on the point. While the fly works well as a searching nymph, it can also be productive during a hatch (more trout than you might suspect are taking nymphs off the bottom rather than duns off the top).


Hot Spot Pheasant Tail

(Originator Unknown) pattern from Westfly
hotspotpheasanttailHook – Mustad 9671, sizes 8-20
Thread – Brown
Tail – Four pheasant tail fibers
Rib – Fine copper wire
Body – Pheasant tail fibers wrapped on hook
Thorax – Orange or chartreuse Haretron or sparkle dubbing
Wingcase – Pheasant tail fibers pulled over the thorax

Uses – The bright thorax may help fish focus on this variation of the traditional Pheasant Tail Nymph. “Hot spots” such as this bright thorax may not be as unnatural as they might appear.

Variations – Can be tied with or without a beadhead. Vary the size to match different insect species.

You can pick up Dave Hughes book, “Western Mayfly Hatches” at Amazon books by going to the following link. It is where most of this information came from.

http://www.amazon.com/Western-Mayfly-Hatches-Rockies-Pacific

Patterns – Blue Wing Olives “Baetis”

I’ve always wanted to put it all together, the bugs, the flies and the techniques to fish them. The Fly Fishing Traditions blog is sort of my Masters Thesis in Fly Fishing. Kinda, Sorta! For me it’s a quest of learning about the entomology, the fly patterns to match the hatch and the necessary techniques to play the game effectively. Done in a everyday workman’s or tradesman’s type way and along the way having fun with it.

This blog entry, “Patterns – Blue Wing Olives Baetis” is my attempt to cover the fly patterns portion of the equation. I am hoping to follow this up with future blog entries to cover the bugs as the season progresses, Skwalas, PMD’s etc. But as always life gets in the way so we’ll see how it goes.

So, this is the follow up to the blog post “Bugs – The Baetis – Blue Wing Olives” with a selection of patterns that will cover the hatch. This of course is by no means the only patterns that are available for the BWO, Baetis hatch, but will give me and hopefully others a good idea how to set up a fly box to match it. Read some John Gierach stories about him and A.K. Best fishing the BWO hatch, one of his favorite hatches and you’ll get a good insight too.

I have researched and provided some patterns and recipes with brief comments on when and how to fish the patterns.

I hope that you will find these patterns useful and when you’re on the river when a BWO hatch comes off, you’ll be prepared. I know I’d like to find some time to tie some of these patterns up myself. Maybe soon!

I did most of my research on the internet and at http://www.westfly.com/ which is a great site. Check it out for specific tying techniques and steps for most of the patterns listed herein. A great tying instruction book is “Tying Dries” by Randall Kaufman. It’s sort of my bible for tying.

Hogan Brown’s Patterns

When I look into my flyboxes and I think about what fly to reach for and which one’s that I have the most confidence in, I often choose one of Hogan’ Brown’s patterns. Hogan learned and perfected his craft right here on the Lower Yuba River. So when trying to match a Baetis, BWO, why wouldn’t I not go for one of his following patterns? I usually go there first and there is a reason that I have confidence in them. They work. I haven’t been able to locate tying instructions for most of his patterns but his flies are distributed through “Iydlewilde Flies” and are available at Nevada City Anglers, The Fly Shop and most other resources on line.

Hogan’s S&M Nymph

Hogan_s_S_M_Nymph_-_OliveHook – TMC 3769 #16-18
Thread – Dark Brown 8/0
Weight – Copper Bead
Ribbing – Wapsi Olive Ultra Wire, SM
Abdomen – Olive Thread 8/0
Tail – Pheasant Tail Fibers
Wingcase – Dark Brown Goose Biot
Thorax – Dark Olive Antron
Legs – Olive Krystal Flash

Notes: I first started using the S&M Nymph when fishing the Lower Sacramento River and it has been a proven producer. When the Lower Sac goes into the small bug bite mode I usually have an S&M nymph or a Military May nymph rigged up. From what I have researched the S&M nymph is weighted by use of a Copper bead head but has additional sinking capabilities through the use of a thread body, streamline shape, and Ultra wire for the distinct segmentation. Hogan uses a Goose Biot for the wingcase which provides a distinct color contrast to the thorax which is typical with natural baetis nymphs having a darker hue on the top of the thorax. Krystal Flash is used for the legs which provides attraction and movement to the fly yet does not detract from it’s sinkability. I’ve often used it as a dropper on the Lower Sac and Lower Yuba when I need to get the nymph down quickly.


Hogan’s Military May

Hogan_s_Miitary_May_-_OliveHogan’s Military May has a more slender profile than the S&M nynph. It’s a great idea to catch some baetis nymphs from your screen need when sampling, put them in a white jar lid and then stick your S&M nymph and Military May or Better Baetis nymph in and see which profile matches the natural best. You might be surprised.


Hogan’s Better Baetis

Hogan's Better BaetisI believe that this matches the smallest BWO the best.


Hogan’s BWO Sipper

Hogan_s_Sipper_-_BWOThe Hogan’s BWO Sipper has also been productive during the BWO hatches when the nymphs are emerging and when you have duns riding the surface.


Proven Dry Fly Patterns for the BWO, “Baetis”

Parachute Baetis

parachutebaetis_TYO_Hook – 900BL, sizes 16-20
Thread – Olive
Wing – Mallard flank, tied parachute style
Tail – Two blue dun Micro Fibbets, split
Body – Olive Haretron or Superfine
Hackle – Natural or olive-dyed grizzly

When to Use – Use parachute style flies to ride low in the water and provide a realistic silhouette on runs and glides. Use this fly during hatches of blue-winged olive (Baetis) mayflies when you are matching the dun stage.

Variations – Vary the size and body color to match whatever is hatching. Body colors will range from olive, to brown-olive, to brown. As always a good idea catch a sample to match color.

How to Fish – Dress the fly with floatant and use standard dry fly presentations. Size counts. During a hatch, try to snag a natural insect, then pick a parachute pattern that is the same size. As Rick Hafele says it’s the most important trigger.


Sparkle Dun

Created by Craig Mathews and John Juracek
sparkledunHook – TMC 100, sizes 16-20
Thread – Yellow (Olive to match the BWO)
Wing – Deer hair, dyed gray. When done tying, flare the wing so it forms an upright semi-circle over the fly.
Tail – Tan Z-lon, not too thick, (Dun or Olive for the BWO)
Body – Pale yellow Superfine ( Olive to match natural for the BWO)

Note: The photo below is to match a PMD, Match the colors of the BWO.

Uses – The sparkle dun imitates a hatching mayfly dun. Use this pattern during a hatch when the duns are on the water and trout are feeding on them. The Sparkle Dun is one of the most useful styles to learn to tie. It is not a difficult pattern to master, and it catches fish. Essentially, the fly is a Comparadun with a Z-lon tail that represents the shuck the dun has just emerged from. It’s a clever and deadly variation. Craig Matthews should know!

Why does it work so well? Because a dun that has just emerged from the shuck has to dry its wings before it can fly off; thus, it will be on the water for the maximum amount of time. If you were a trout, which mayfly dun would you prefer: one that might fly away before you sip it down, or one that is guaranteed to still be there after you spend the energy to reach it?

Variations – A useful variation is the CDC Sparkle Dun, which uses CDC fibers for the wing. This latter variation is sometimes tied with a mallard flank wing in front of the CDC, but they say that the trout don’t care if the mallard flank is there or not.
This dressing imitates a hatching PMD. To imitate other mayfly duns, vary the size and color.

How to Fish – Dress the fly with floatant and use standard dry fly presentations.


Comparadun

Created by Al Caucci and Bob Nastasi
comparadunHook – 900BL, size 12-16, (16 to 20 for BWO)
Thread – Brown (Olive for the BWO)
Wing – Mottled gray deer hair tied upright and flared
Tail – Blue dun hackle fibers, split
Body – Tan Superfine or to match dun color (Olive to match naturals for the BWO)

Uses – Comparaduns are useful, durable patterns that imitate the dun stage of mayflies. Use them during a hatch when duns are on the water and are being taken by trout. Comparaduns ride well and float without hackle, which is an advantage on slow, quiet stretches of water. The pattern is more durable than a No Hackle, but it’s not as effective on spring creeks.

Variations – Other mayflies can be imitated by using hook sizes and body colors that match the natural insect.

How to Fish – Dress the fly with floatant and use standard dry fly presentations.


Thorax, Olive

Check out Randal Kaufmann’s “Dry Flies” for tying instructions.
thoraxdunHook – TMC 100, sizes 14-20
Thread – Black
Wing – White hackle tips
Tail – Dun hackle or Betts’ Tailing Fibers
Body – Superfine to match natural insect
Hackle – Light dun. Clip the bottom so it rides flush in the surface film.

Uses – Thorax-style dry flies provide a realistic silhouette and were designed to be used on spring creeks and other slow, clear water situations. Use this pattern during hatches of small mayflies when the duns are on the water.

Variations – Vary the color and hook size to match other mayflies.

How to Fish – Dress the fly with floatant and use standard dry fly presentations. The fly is intended for slow, smooth flows; it will not float well in rough water.


CDC Baetis

Created by Dave Hill
cdcbaetisHook – TMC 100, sizes 16-20
Thread – Olive
Tail – Betts’ Tailing Fibers
Body – Olive Dazl-Tron
Wing – CDC, natural dun color

Uses – Use to imitate blue-winged olive (Baetis) duns when there is a hatch in progress and trout are taking duns from the surface. Because this fly has no hackle, it is particularly effective on slow water, spring creeks, and other situations where trout are acting in a persnickity manner.

Variations – Blue-winged olives come in body colors that range from olive to brown. Choose a color that matches the insects available to trout when and where you are fishing.

How to Fish – Do NOT dress the fly with floatant! CDC flies should be fished au natural. When a fly no longer floats well, put it in a small container of powdered descicant, such as Dry Shake, and shake it up. This removes the moisture, and you’re ready to cast again. Use standard dry fly presentations.


Proven Nymph Patterns

Pale Baetis Nymph

Created by Jeff Morgan
palebaetisnymphHook – Dai Riki 310, size 20-22
Thread – 8/0 rusty dun
Tail – Three short widgeon flank feathers
Abdomen – Tying thread, perhaps counter-ribbed with iron gray 8/0 thread
Thorax – One or two wraps of pale olive dubbing
Wingcase – Mottled oak Thinskin
Legs – Pale olive Antron fibers, sparse

Uses – Imitates nymphs of blue-winged olives.

How to Fish – In rivers, the fly can be presented near the surface, but it is usually most productive when fished near the bottom on a dead drift with the indicator or tight line presentations. To achieve the right depth, you may need to put weight on the leader or use the fly on a dropper with a heavier fly on the point. While the fly works well as a searching nymph, it can also be productive during a hatch (more trout than you might suspect are taking nymphs off the bottom rather than duns off the top).


Hot Spot Pheasant Tail

hotspotpheasanttailHook – Mustad 9671, sizes 8-20
Thread – Brown
Tail – Four pheasant tail fibers
Rib – Fine copper wire
Body – Pheasant tail fibers wrapped on hook
Thorax – Orange or chartreuse Haretron or sparkle dubbing
Wingcase – Pheasant tail fibers pulled over the thorax

Uses – The bright thorax may help fish focus on this variation of the traditional Pheasant Tail Nymph. “Hot spots” such as this bright thorax may not be as unnatural as they might appear.

Variations – Can be tied with or without a beadhead. Vary the size to match different insect species.

How to Fish – In rivers, the fly can be presented near the surface, but it is usually most productive when fished near the bottom on a dead drift with the indicator or tight line presentations.


Proven Emerger and Cripple Patterns


Baetis Cripple

Created by Bob Quigley
baetiscripple_side_300Hook – 1X Fine wire, Standard shank, Turned-Down eye; e.g., TMC 100 or equivalent; sizes 16-20
Thread – Brown
Tail – Pheasant tail fibers
Abdomen – Wrapped pheasant tail fibers
Thorax – Olive or brown Superfine dubbing
Wing – Tan deer hair
Hackle – Olive grizzly

Uses – “Cripple” patterns represent mayflies that are either just emerging or that got stuck in the shuck while emerging. In either case, the insect isn’t going anywhere soon. Trout recognize this vulnerable condition and feed eagerly on cripples when they see them. When you’re confronted with a blizzard hatch, where your fly is one small speck among hundreds or thousands of natural insects, a cripple pattern is a great way to induce trout to take your fake.

This dressing is in the “Quigley” style and represents a crippled blue-winged olive (Baetis) mayfly.

Variations – Blue-winged olives come in body colors that range from olive to brown. Choose a color that matches the insects available to trout when and where you are fishing.

How to Fish – Dress the front half of the fly (only) with floatant and use standard dry fly presentations


Baetis Marabou Cripple

Created by Bob Quigley
quigleys_marabou_cripple_bwoHook – TMC 2302, #8-10
Thread – Olive 6/0
Tail – 3 Olive Emu Fibers
Wing – Yellow Dyed Deer Hair
Abdomen – Olive Marabou
Ribbing – Single Strand of Dark Green Floss
Thorax – Deer Hair
Hackle – Light Grey Hackle


Barrs Emerger

barremerge7John Barr created this pattern in 1975 while fishing upon the Nelson’s Spring Creek in Montana. Noticing that he was getting little interest in a PMD hatch with his dry patterns, he used a nymph and finally caught a trout. Upon pumping the stomach, John noticed that partially hatched nymphs with the shuck still attached were present on the back of the trout’s tongue. John developed his emerger pattern based upon the appearance of these partially developed nymphs and created his “Barr’s Emerger”.

Hook – TMC 106TC #16-24
Thread – Olive 8/0
Abdomen – Brown/Olive Dubbing with Antron mixed
Tail – Brown Hackle Fibers
Thorax – PMD Superfine
Wingcase – Dun Hackle Fibers


CDC Bubble Emerger

barremerge7Hook – Dai Riki 135, sizes 18-22
Tail – Pheasant tail fibers
Ribbing (Optional) – Fine brass
Abdomen – Pheasant Tail fibers wrapped on hook
Wing – Bubble of CDC. Use white for tricos or PMDs, dun for others
Overwing – 1-3 strands of pearl Krystalflash
Thorax – Dubbing to match natural

Uses – Many blue-winged olive (Baetis) spinners dive or crawl underwater to lay their eggs. This fly imitates those spinners, and fishes well when you see lots of adults flying around but you can’t get trout to take your dun imitations. A beautiful pattern, you’ll these just for the pleasure of it. But don’t forget to cast them!

Variations – Blue-winged olives vary slightly in color from olive to brown, depending on species, location, and time of year. Try to match the size and color of the natural insects, but remember that size is more important than color. If you want, you can add a pearl bead in the thorax.

How to Fish – Use indicator or tight line nymphing tactics.


Diving Baetis Spinner

divingbaetisHook – Dai Riki 310 or 305, size 16-22
Tails – Dun Microfibetts
Egg Sac – Bright yellow dubbing
Body – Olive-brown turkey biot or olive-brown dubbing
Wing – Z-wing or tan Raffia, tied back and clipped to shape
Hackle – One-and-half wraps of starling

Uses – Many blue-winged olive (Baetis) spinners dive or crawl underwater to lay their eggs. This fly imitates those spinners, and fishes well when you see lots of adults flying around but you can’t get trout to take your dun imitations.A beautiful pattern, you’ll these just for the pleasure of it. But don’t forget to cast them!

Variations – Blue-winged olives vary slightly in color from olive to brown, depending on species, location, and time of year. Try to match the size and color of the natural insects, but remember that size is more important than color. If you want, you can add a pearl bead in the thorax.

How to Fish – Use indicator or tight line nymphing tactics.


Proven Spinner Pattern

CDC Biot Spinner

cdcbiotspinner_top_300Hook – 1X Fine wire, Standard shank, Turned-Down eye; e.g., TMC 100 or equivalent; sizes 16-20
Thread – Olive
Underwing – Light blue dun CDC, tied spread-eagled (spinner style)
Overwing – Light blue dun Z-lon
Tail – Light blue dun Betts’ Tailing Fibers. Use 2-4 and split them.
Abdomen – Olive turkey biot
Thorax – Medium olive or olive-brown Superfine

Uses – Use to imitate mayfly spinners when the natural spinners are on the water and trout are taking them from the surface.

Variations – This dressing is for a blue-winged olive mayfly spinner. Other mayflies can be imitated by using hook sizes and body colors that match the natural insect.

How to Fish – Do NOT dress the fly with floatant! CDC flies should be fished au natural. When a fly no longer floats well, put it in a small container of powdered descicant, such as Dry Shake, and shake it up. This removes the moisture, and you’re ready to cast again. Use standard dry fly presentations.


Hen Spinner, Blue Quill

Created by Mike Lawsen
henspinnerHook – TMC 100, sizes 12-18
Thread – Gray
Wing – Light blue dun hen hackle tips, tied spread-eagled
Tail – Blue dun hackle fibers, split
Body – Blue-dyed hackle feather stem
Hackle – Blue dun, clipped top and bottom

Uses – When trout are sipping the spinner stage of mayflies, this can be an effective pattern. Tied in the right sizes, this dressing imitates the spinner stage of many blue-winged olives and most blue duns. The wings should lie flat on the water. Check out additional photos of this fly pattern at http://www.westfly.com/

Variations – The Rusty Spinner, which imitates the spinner stage of many blue-winged olive mayflies, is tied on size 14-18 hooks with a dubbed body of rust-brown Superfine. Vary the size and colors to match other mayfly spinners.

How to Fish – Dress the fly with floatant (be careful of the wings) and use standard dry fly presentations.